Netduino Plus + Visual Studio 2015 + Windows 10

Just grabbed my old Netduino Plus Gen 1 and wanted to use it but it's quit challenging to find information of how to this in a modern setup.
Installing the .NET Micro Framework SDK v4.2 from the the downloads page does not work because it requires Visual Studio 2010.
After a bit of trial-and-error her is what finally worked for me:

  1. Browse to netduino.com/downloads and download and install in the given order this from the "netduino 3, netduino 2 and go" section:
    1. .NET Micro Framework SDK v4.3
    2. Netduino SDK v4.3.2.1
    3. Netduino Legacy Templates Not available anymore
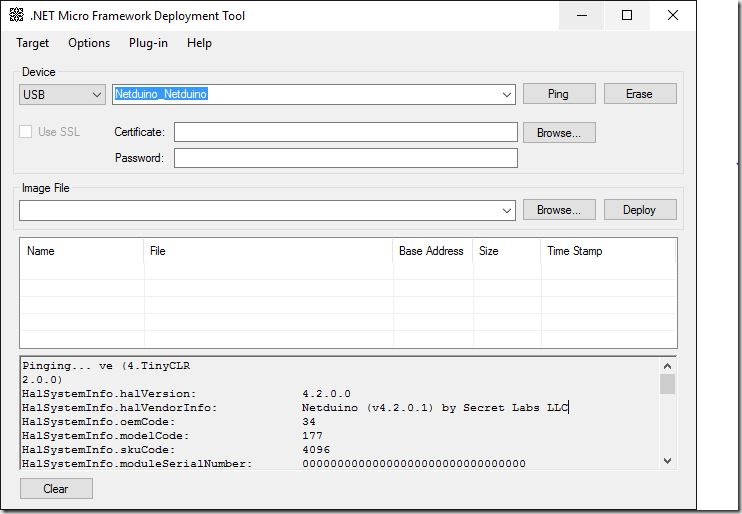
  2. Run MFDeploy.exe to verify that you can Ping your device and press "Ctrl + Shift + C "to check that you have the latest firmware (v4.2.0.1, upgrade if you don't have it):
     mfdeploy
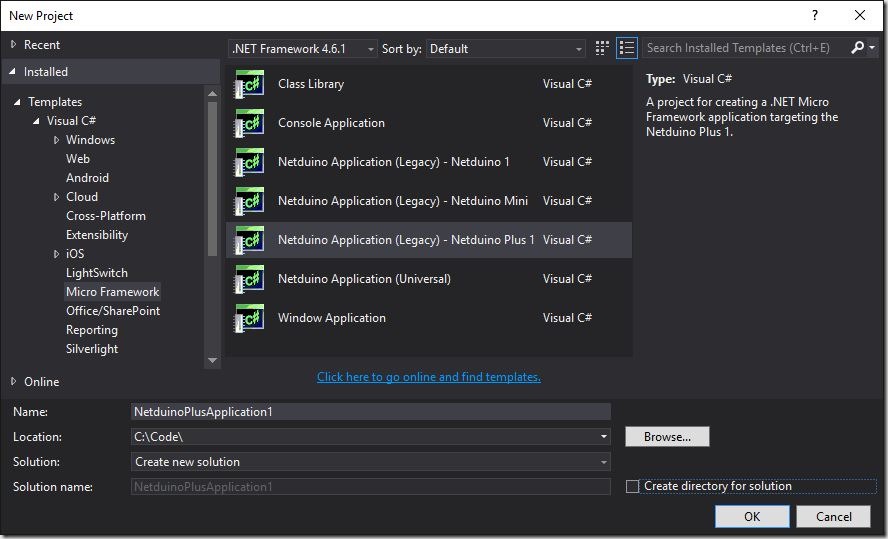
  3. Run Visual Studio 2015, open the Extension Manager, install ".NET Micro Framework Project System" and restart your IDE.
  4. You should now have the right project templates available and are ready to go:
    vs2015_newproject

Run dedicated UT2004 x64 server under Windows 8

  1. Download and extract "dedicatedserver3339-bonuspack.zip"
  2. Download "ut2004-win64-3369.zip" and extract to the same directory as the server files
  3. Download "Win32-3369CrashFix.zip" and extract it to the "System" server directory
  4. Change your "RunServer.bat" to use "ucc-win64.exe" instant of "ucc.exe"
  5. Run it with your config and...
    you may end up with an error like this:
    Log: Log file open, 06/06/14 23:16:42
    Init: Name subsystem initialized
    Init: Detected: Microsoft Windows NT 6.2 (Build: 9200)
    Init: Version: 3369 (128.29)
    Init: Compiled: Dec  5 2005 03:55:07
    Init: Command line: DM-1on1-Aerowalk?game=XGame.xDeathMatch ini=UT2004.ini log=server.log -lanplay
    Init: (This is Win64 patch version 3369.0)
    Init: Character set: Unicode
    Init: Base directory: C:\dedicatedserver3339\System\
    Init: Ini:UT2004.ini   UserIni:User.ini
    Init: Build label:  Build UT2004_Build_[2004-11-11_10.48]
    Init: Object subsystem initialized
    Log: Executing Class Engine.ServerCommandlet
    Log: Browse: DM-1on1-Aerowalk?Name=Player?Class=Engine.Pawn?Character=Jakob?team=255?game=XGame.xDeathMatch
    Log: Collecting garbage
    Log: Purging garbage
    Log: Garbage: objects: 34709->34701; refs: 390366
    Log: Game class is 'xDeathMatch'
    Log: VERIFY: Class AMasterServerUplink size problem; Script=1712 C++=1744
    Critical: IpDrv C++/UnrealScript class size mismatch
    Exit: Executing UObject::StaticShutdownAfterError
    Critical: InitSockets
    Critical: UTcpNetDriver::UTcpNetDriver
    Critical: UTcpNetDriver::InitListen
    Critical: ULevel::Listen
    Critical: Listen
    Critical: UGameEngine::LoadMap
    Critical: LocalMapURL
    Critical: UGameEngine::Browse
    Critical: UGameEngine::Init
    Critical: UServerCommandlet::Main
    Exit: Exiting.
    Log: FileManager: Reading 0 GByte 40 MByte 985 KByte 902 Bytes from HD took 0.153000 seconds (0.138000 reading, 0.015000 seeking).
    Log: FileManager: 0.017000 seconds spent with misc. duties
    Uninitialized: Name subsystem shut down
    Uninitialized: Log file closed, 06/06/14 23:16:44
  6. To fix this copy the files
    • System\IpDrv.dll
    • System\IpDrv.int
    • System\IpDrv.u
    from a full UT2004 installation into the server "System" directory and overwrite the old ones
  7. Now execute "RunServer.bat" again, he should now start normally.
    Happy fracking ^^

C# List to Enum flags

This little helper method create a Enum bit field of the requested Type and ignore invalid values and lower/upper case:


public static T ListToEnumFlags<T>(List<string> enumFlagsAsList) where T : struct
{
	if (!typeof(T).IsEnum)
		throw new NotSupportedException(typeof(T).Name + " is not an Enum");
	T flags;
	enumFlagsAsList.RemoveAll(c => !Enum.TryParse(c, true, out flags));
	var commaSeparatedFlags = string.Join(",", enumFlagsAsList);
	Enum.TryParse(commaSeparatedFlags, true, out flags);
	return flags;
}

Sample usage:

[Test]
public void ConvertListToEnumFlags()
{
	var stringFlags = new List<string> { "read", "Write", "invalid" };
	var permissions = ListToEnumFlags<Permission>(stringFlags);
	Assert.AreEqual(Permission.Read | Permission.Write, permissions);
}

[Flags]
public enum Permission
{
	Read = 1,
	Write = 2,
	Delete = 4
}

Compile and run Vala on Windows using MinGW-builds

A quick tutorial how you can compile the valac compiler on Windows 8.1 to compile and run Vala programs.


    1. Download MinGW-builds from http://sourceforge.net/projects/mingwbuilds/
    2. Run "mingw-builds-install.exe", select "x32" as Architecture, "win32" as Threads and "sjlj" as Exception:

    3. Continue installation, I placed my to "C:\mingw-builds"
    4. Download the latest "external-binary-packages" from http://sourceforge.net/projects/mingwbuilds/files/external-binary-packages/ and copy the "msys" directory to "C:\mingw-builds\mingw32"
    5. Open "‪C:\mingw-builds\mingw32\msys\etc\fstab" with Notepad++ and add the line "C:\mingw-builds\mingw32 /mingw".
    6. Download the Win32 GTK+ "all-in-one bundle" from http://www.gtk.org/download/win32.php and extract it's content to "C:\mingw-builds\mingw32".
    7. Create a new shortcut, e.g. on the Desktop and set the location to "C:\mingw-builds\mingw32\msys\bin\mintty.exe /bin/bash -l" in order to get a nice shell.
    8. Download the latest source tarball from https://wiki.gnome.org/Projects/Vala/Release and extract it to "C:\mingw-builds\mingw32\msys\home\{Your Username}".
    9. Run the Mintty shortcut you created in step 7 and switch with "cd" to the vala source directory.
    10. Now you should be able to run the fallowing three commands without any issues:
      ./configure --prefix=/mingw --host=i686-w64-mingw32
      make
      make install
    11. Run "valac" to see if it works:
      $ valac --version
      Vala 0.22.1
    12. Go to "Control Panel\System and Security\System" -> "Advanced system settings" ->  "Environment Variables" and add this to your "Path" system variable:
      C:\mingw-builds\mingw32\bin
    13. Create somewhere a file called "hello.vala" and paste in this:
      using Gtk;
      
      int main (string[] args) {
          Gtk.init (ref args);
      
          var window = new Window ();
          window.title = "First GTK+ Program";
          window.border_width = 10;
          window.window_position = WindowPosition.CENTER;
          window.set_default_size (350, 70);
          window.destroy.connect (Gtk.main_quit);
      
          var button = new Button.with_label ("Click me!");
          button.clicked.connect (() => {
              button.label = "Thank you";
          });
      
          window.add (button);
          window.show_all ();
      
          Gtk.main ();
          return 0;
      }
    14. Open a normal Windows CMD, cd to the location of the file and run "valac --pkg gtk+-3.0 -X -mwindows hello.vala"
    15. Execute the compiled "hello.exe", you should see your first Vala GTK+ window, congratulation Cool:

Run Pyload as Windows Service

Here a quick tutorial how to run Pyload as a Service under Windows Server 2012 (should also work with Windows 2000 or later):

  1. Download NSSM - the Non-Sucking Service Manager and extract it to a permanent location.
  2. Open a command propmt as Administrator and run "nssm.exe install Pyload"
  3. A new window pops up and you have to select the "pyLoadCore.exe" as Application
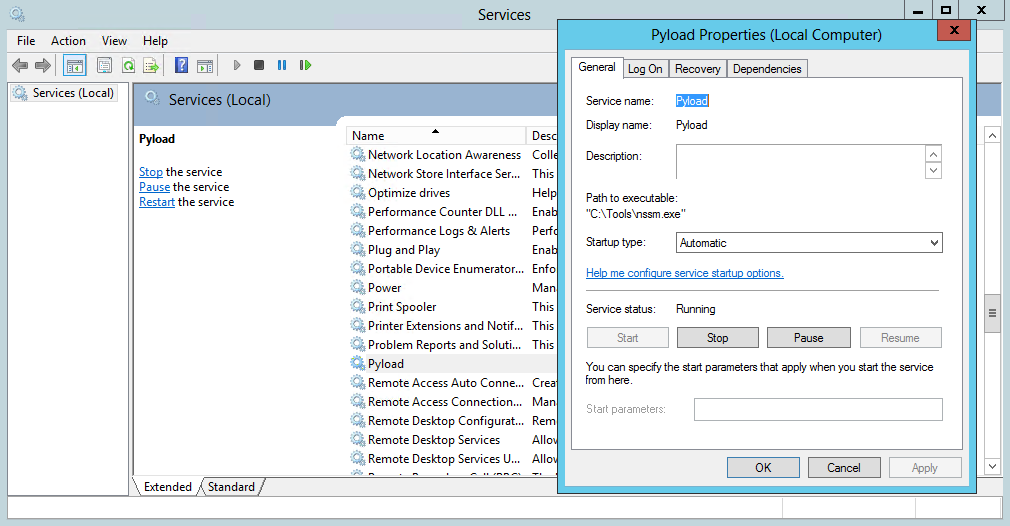
  4. Click "Install service" and start it via "services.msc":