20. March 2013
Hendrik
C#
With this snippet you can check if your test assembly was loaded by the nunit-console (domain name starts with "test-domain-") or by the TeamCity JetBrains.BuildServer.NUnitLauncher (domain name is "NUnit Domain"):
private static bool IsStartedFromNunit()
{
	string currentDomainName = AppDomain.CurrentDomain.FriendlyName;
	return currentDomainName.StartsWith("test-domain-") || currentDomainName == "NUnit Domain";
}
11. January 2013
Hendrik
C#
Got this strange error today while using Roslyn via NuGet.
To fix it check this:
- The is not outdated version of the "Roslyn.Services.dll" process running (check task manager)
- The platform target of your DLL or application is "Any CPU"
- Visual Studio 2012: Disable "Prefer 32-bit" under the "Platform target" drop-down menu for your startup project.
This was the reason why it was not working for me.
31. December 2012
Hendrik
C#
Everyone who worked with ClickOnce to publish his software knows about the big issue that proxy authentication is not supported by Microsoft and you just get a nasty error message like this:
The remote server returned an error: (407) Proxy Authentication Required.
Matt Davis wrote a blog post back in 2009 how developer can bypass this issue when downloading updates.
However, this is only possible after the software was deployed on the target machine, e.g. it is necessary to create a offline setup and set it to the customer.
To solve this issue I created a loader that replace the original "dfsvc.exe" of the .NET Framework and set a custom web proxy like described in the post by Matt Davis and then invokes the internal entry point (named "System.Deployment.Application.DFServiceEntryPoint.Initialize").
The source code is available here on GitHub.
This project has two build configuration, "netfx2-Release" and "netfx4-Release" which will build a .NET 2.0 and 4.0 version of "dfsvc.exe" and copy it inside the "Build" directory of the solution.
Also there is a "ClickOnceProxySettings.xml" file where you have to configure your proxy credentials.
So how do you use this?
- Download ClickOnceWithProxySupport_v0.1.zip (8.88 kb)
- Extract the "Build" directory
- Open "ClickOnceProxySettings.xml" with Notepad and set your credentials
- Inside the Windows Explorer, navigate to "%windir%\Microsoft.NET"
- Copy the "ClickOnceProxySettings.xml" inside this directory
- Depending if you have a 32 or 64 bit installation you have two sub directories: "Framework" and "Framework64" (on x64 only).
Inside this directories you have a folder "v2.0.50727" and/or "v4.0.30319" (also depend on which framework versions you have installed).
- Now you have to copy in each directory the right version of the "dfsvc.exe" from the "Build" directory, just look at the table below:
| Framework\v2.0.50727 |
Build\netfx2-Release |
| Framework\v4.0.30319 |
Build\netfx4-Release |
| Framework64\v2.0.50727 |
Build\netfx2-Release |
| Framework64\v4.0.30319 |
Build\netfx4-Release |
Make sure that there is currently no instance of "dfsvc.exe" running (check taskmanager)
- That's it, you should now be able to run ClickOnce based online installations thought a proxy server with authentication

28. December 2012
Hendrik
This should be the start of a series of post about how to install and configure CruiseControl.NET on a Windows Server 2012 system.
In the next upcomming posts I will also show you how to compile C#/C++ project, run unit test, setting security permissions and some more advanced stuff.
Setting up the IIS:
First of all we have to install and configure the IIS on our system.
- Open the Server Manager
- On the welcome screen, click "Add roles or features"
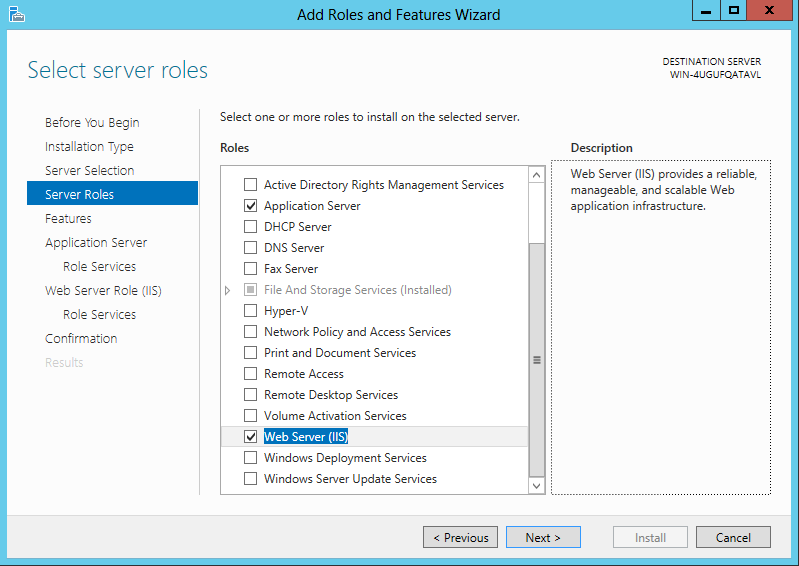
- When the wizard has been opened, click "Next" until you reach the "Server Roles" section and select "Application Server" and "Web Server (IIS)":
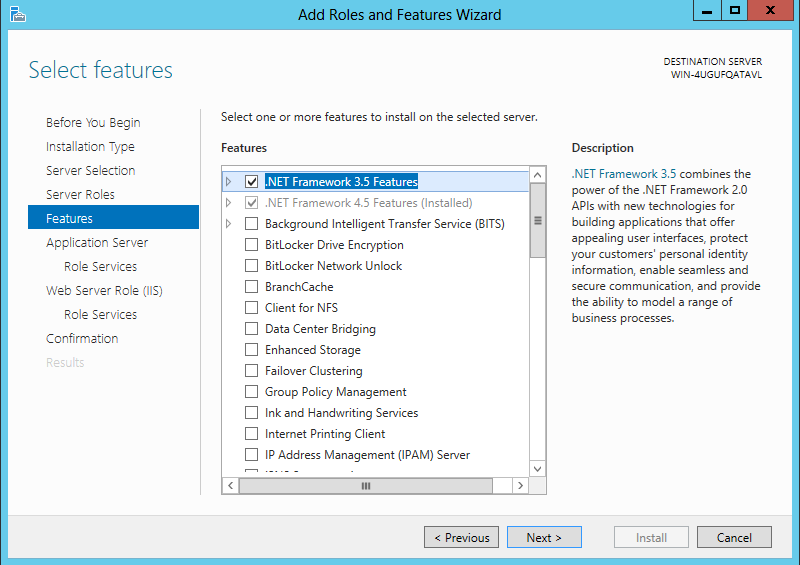
- Click "Next" and select ".NET Framework 3.5 Features":
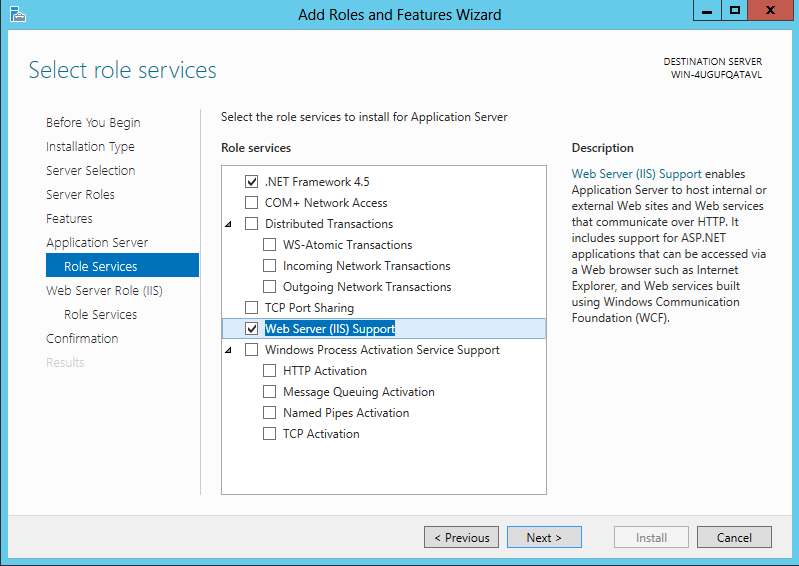
- Continue to the "Application Server" -> "Role Services" section and select "Web Server (IIS) Support":
- Now go to "Web Server Role (IIS) -> "Role Services" and expand the "Application Development" node and select ".NET Extensibility 3.5" and "ASP.NET 3.5":
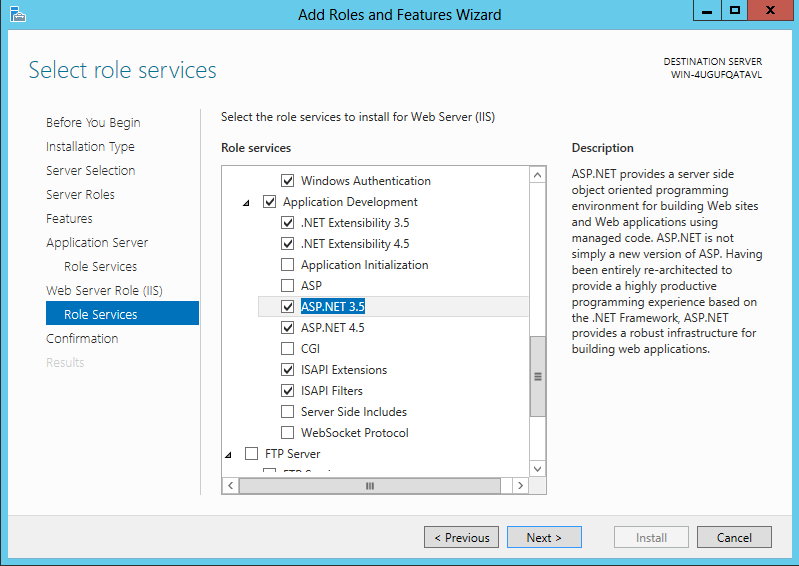
- Click "Next" and hit "Install".
Setting up the webdashboard:
- Download CruiseControl.NET and install it where you like (leave all the default settings).
- Open the "IIS Manager"
- Right click on "Application Pools" and select "Add Application Pool..." and configure it like this:
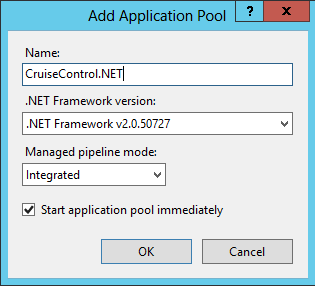
- Add a new application under the "Default Web Site" and select the just created "CruiseControl.NET" application pool and point to the path where the "webdashboard" directory of your installation is:
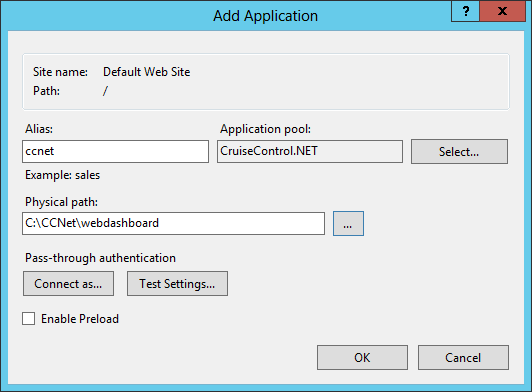
Configure the windows service:
- Create a new local user called "CruiseControl"
- Open the "Server Manager", click on "Tools" and select "Services".
- Search for "CruiseControl.NET Server" and open the entry
- Change the "Startup type" to "Automatic".
- Open the "Log On" tab, select "This account" and enter your CruiseControl account credentials:
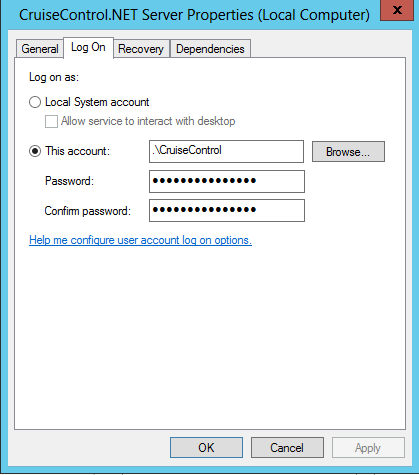
- If you want to run integration tests on your build server that require to created windows or stuff like this you have to enable the "interact with desktop" feature for this service.
By default this is only possible when using the "Local System" account but here is a great post of how to this with every user.
- Start the service.
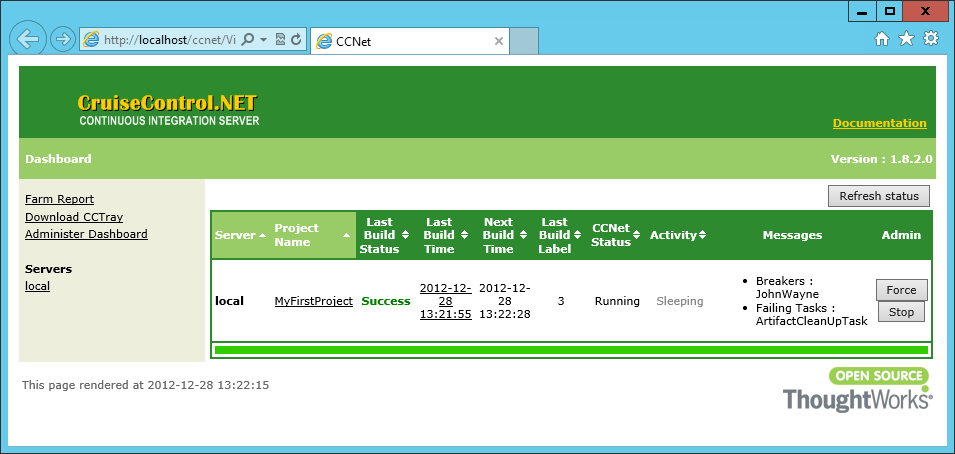
Now open http://localhost/ccnet or what ever you've configured and everything should work. Congratulation 
